Chicken Coop Renovation - Part 2
with lots of pictures!
 |
| old kitchen-et |
…..After some back and forth between Benay’s engineer and our designer Rod Lambert, we finally agreed on the floor plan and structural details that would be submitted to the town’s building department for approval.
 |
| special tile in new kitchen |
The goal was to create a 3 bedroom, 2 bath home out of the funky old coop while keeping as much of the original rustic character of the building intact. Although we had plans to work off of, they weren’t as detailed as most and we could see that it was going to be necessary to keep an open mind to possible changes and adaptations as the project progressed. Benay, who in fact prefers unique second hand building materials to new, is also a person who does her best designing when immersed in the process. Because of that, and the nature of renovating a structure of this kind, the plans never really stopped evolving. From the moment we drove the first nail, right up to the installation of the last salvaged light fixture, creative designing and on the fly decision making became the norm. Like an art project built by collaboration, it was necessary to stay flexible and not get too attached to any one idea. Not exactly a builders dream- but an interesting challenge.
Getting underway

The job before us was a daunting one, just how we’d accomplish everything that needed doing wasn’t completely clear. The obvious first step however was to remove all the junk and begin the dirty job of gutting the interior. Make shift wall partitions partially covered in drywall, funky old duct work, electrical lines --all of which had no doubt been lovingly installed by previous do-gooders, along with about 30 vintage multi-pane windows were unceremoniously stripped from the building. As was the falling down ceiling on the second floor, which was comprised of 3 inch diameter pine poles(later to become part of deck railing), haphazardly covered with random flat pieces of whatever- who ever -could get their hands on, this all supporting a dusty mix of insulation, bird nests and cobwebs; the entire mess was pitched out the now vacant windows to be sorted later on.
 |
| beam added to support 2nd floor flanked by origianl round joists |
Removing the junk and cleaning the space helped to shed some light on what was looking like a reasonably good sized living space. An optimism of “Hey, maybe this won’t be so bad…”- filled the air. We could now more easily see and contemplate the larger issues we were facing. For starters the severely cracked concrete floor which amazingly sloped up to 4 inches in 2 different directions, Not to be out done by the upstairs exterior walls which bowed out in the middle as much as 6 inches- on each side of the building!
 |
| lots of windows included in living room |
 |
| threaded 1" steel rod keeping up the roof |
The badly outward leaning walls (two who’s 4x6 collar ties had come unattached long ago), were being held together by two strategically placed steel rods that impressively spanned the 20’ across the width of the second floor living space (at about forehead level). The rods (we eventually removed these too) were held in place (and thus kept the walls in and the roof up) by very large washers and nuts which had been threaded on to each end of each rod,- just below the low-ish roof line- (which as I mentioned) was around the height of my forehead. It wasn’t long before we had yellow caution tape wrapped around these steel bars, as they offered a nasty whack on the head if you weren’t paying close enough attention, or in my case wearing a baseball cap that impeded my view.
 |
| after the higher section was removed |
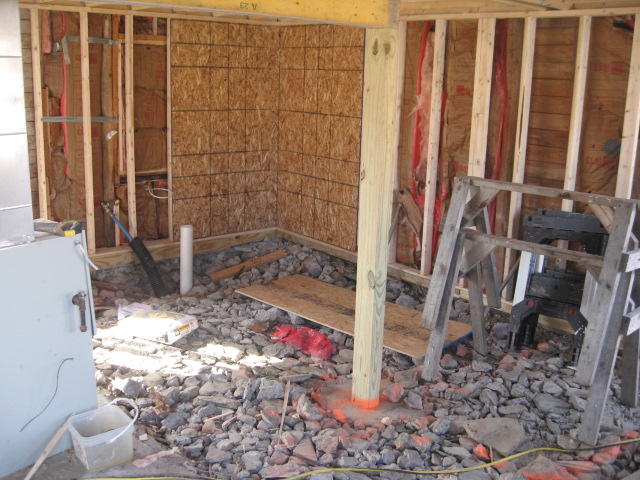
Returning to the other major issue the building was suffering a severely cracked and sloping concrete floor, it is true the upstairs wooden floor was also sloping badly, but I am focusing here on the ground floor. In addition to this concrete problem, about ¼ of the solid floor surface (around 200 sq’) was for some unknown reason 3 inches higher than the rest. Since there wasn’t enough height under the second floor joists and beams to add the 2 inches of rigid insulation and the four inches of new concrete we planned for, as well as accommodate this weird higher section of floor while still meeting code on ceiling heights, the higher section of concrete had to be removed. Thankfully this chunk of difficult work was skillfully handled by two friends of Benay’s (and one jackhammer) over a long weekend. Great for us but more importantly it thrilled the plumber who now had to a place to route and hide his drain lines in what would become the new concrete floor.
Framing the place
 |
| insulation and pex for radiant heat -ready for concrete |
 |
| big windows just about everywhere |

The engineering called for all new lumber to be sistered to the existing framing throughout the building, (with the exception of the rustic log-like joists that supported the second floor which would be allowed to stand on their own but with new lvl beams under them). This new framing had to be painstakingly cut and installed one piece at a time in order to fit in with what already existed. Level and plumb this building was far from, but by setting aside our levels and going with a more “intuitive” approach to it all, it wasn’t long before we adjusted to the process and had the new walls, window openings and roof rafters mostly framed up. The overall goal with the new framing was to create a structure that could carry the various building loads, accept drywall and other new finish surfaces, be properly insulated, as well as allow for a compliment of new energy efficient windows and doors that needed to fit perfectly within a the strange 2 - layer exterior wall. We were in effect building an entirely new house inside the shell of the old structure and the two needed to get along.
 |
| yes wider at the top! |
Note: It was decided early on that attempting to straighten the existing exterior walls and remove the sag in the roof was not going to be part of the job. Our focus was on stabilizing and strengthening the shape that existed before us albeit an odd one.
Without a doubt the framing work was the trickiest part of the job. Since the exterior walls leaned outward, and the new sistered walls were pretty plumb, the window and door jams became an interesting place where the width of the frames at the base were in some cases 2 or 3 inches narrower than the width at the top! (see photos) If this was tricky for us framers to work out, it was a bit of a nightmare the dry-wallers- and they cursed us for it. The finished look was something like the inside of an adobe boat.
 |
| 7 ft long stain glass in bathroom |
 |
| rebar balasters with painted wood staircase (by rod) |
Throughout the process, Benay (who regularly expressed appreciativeness at our creative solutions and use of materials) had on-hand, or brought in special items that she requested we incorporate in to the house. Examples include; a massive 12 foot long, hand carved post from Afghanistan, this was fitted as a major support between the first and second floor - the 3’ off cut part becoming the newel post at the top of the stairs, as well as numerous vintage glass light fixtures gathered over the years, wood salvaged from another barn on the property, and a number of stain-glass windows that Benay really wanted to have installed, even though from a builders perspective, we had pretty much run out of spaces to put them.
 |
| railing made from hand hewn coller ties |
I have to say, that this project would not have been possible were it not for the willingness of the local code enforcer to go along with a few of the more “unusual choices” in materials and installations. With today’s codes being what they are, there are certainly limitations on how far one is allowed to let their creativity roam when building new. I know for certain that many of the details in Benay’s coop would simply not have been possible in other jurisdictions. I suppose the fact that everything we were doing was improving this building helped the issue.
Finishing the home
If rebuilding the structural bones of the house was the most challenging part of this job, then creating and installing the interior trim and doing the final details was the most satisfying.
 |
| one of many salvaged glass light fixture |

As we neared completion of the project, the interior of the home was day-by-day becoming a uniquely beautiful and cozy space, and I dare say more level and plumb than the homeowner had expected. A customed dark stained concrete, radiantly heated floor gave the space a warm feel. Hundred year old salvaged pine flooring became new generous window sills. Rounded window returns added a clean look to the walls and the upstairs rooms along with the bright natural finished tongue and groove pine flooring installed there. The master bedroom was graced with lovely wood French doors that lead to a modest and unique south facing deck the railing of which was topped with the re-used 4x6 collar ties! The Bathrooms received a re-used claw foot tub and custom tiled shower respectively and the entire place was finished in an assortment of other recycled wood, metal and tile finishes -- including rebar balusters.
 |
| hand carved from afganastan |
Our client
 |
| one on several salvaged old windows... |
Although this project was difficult compared to others, the owner/client was anything but. Her attitude was always positive, appreciative and supportive. As sometimes happens on projects of this type, where creativity and collaboration between the client and our team is such a driving force, a touch of sadness accompanies the completion of the project. On our last day on site, as we wrapped up a few final trim details, and loaded up our tools,
 |
| Benay and kerrie |
 |
| thick walls meant lots of insulation! |
Benay said that although it was wonderful to see the project completed, she would in fact “really miss working with us, and was sad to see us go, It was great fun working on this together… I consider you all friends”. For our part, a client like Benay is very rare indeed, she had the vision to imagine and courage to commit to making this funky old barn a lovely home. She definitely pushed our boundaries a bit on imagining what was possible there. We appreciated the opportunity to have done this interesting work with her and breathe new life into the old Chicken coop in the process.
Cheers Benay! We hope that you enjoy the space “we created” for many years to come.
On behalf the team,
Kerrie, Rod, Otto and Eric.
Rob Champion


 The job before us was a daunting one, just how we’d accomplish everything that needed doing wasn’t completely clear. The obvious first step however was to remove all the junk and begin the dirty job of gutting the interior. Make shift wall partitions partially covered in drywall, funky old duct work, electrical lines --all of which had no doubt been lovingly installed by previous do-gooders, along with about 30 vintage multi-pane windows were unceremoniously stripped from the building. As was the falling down ceiling on the second floor, which was comprised of 3 inch diameter pine poles(later to become part of deck railing), haphazardly covered with random flat pieces of whatever- who ever -could get their hands on, this all supporting a dusty mix of insulation, bird nests and cobwebs; the entire mess was pitched out the now vacant windows to be sorted later on.


 The engineering called for all new lumber to be sistered to the existing framing throughout the building, (with the exception of the rustic log-like joists that supported the second floor which would be allowed to stand on their own but with new lvl beams under them). This new framing had to be painstakingly cut and installed one piece at a time in order to fit in with what already existed. Level and plumb this building was far from, but by setting aside our levels and going with a more “intuitive” approach to it all, it wasn’t long before we adjusted to the process and had the new walls, window openings and roof rafters mostly framed up. The overall goal with the new framing was to create a structure that could carry the various building loads, accept drywall and other new finish surfaces, be properly insulated, as well as allow for a compliment of new energy efficient windows and doors that needed to fit perfectly within a the strange 2 - layer exterior wall. We were in effect building an entirely new house inside the shell of the old structure and the two needed to get along.


 As we neared completion of the project, the interior of the home was day-by-day becoming a uniquely beautiful and cozy space, and I dare say more level and plumb than the homeowner had expected. A customed dark stained concrete, radiantly heated floor gave the space a warm feel. Hundred year old salvaged pine flooring became new generous window sills. Rounded window returns added a clean look to the walls and the upstairs rooms along with the bright natural finished tongue and groove pine flooring installed there. The master bedroom was graced with lovely wood French doors that lead to a modest and unique south facing deck the railing of which was topped with the re-used 4x6 collar ties! The Bathrooms received a re-used claw foot tub and custom tiled shower respectively and the entire place was finished in an assortment of other recycled wood, metal and tile finishes -- including rebar balusters.


No comments:
Post a Comment